Serverless AI: Deploy Hugging Face Models on SageMaker for Less Than the Cost of a Burger

A Step-by-Step Guide on Deploying and Hosting Hugging Face 🤗 Models on AWS SageMaker Serverless
Machine learning is more accessible than ever, thanks to hubs like Hugging Face, where you can download millions of pretrained models for free. This allows software engineers to integrate machine learning into their solutions quickly.
While most Hugging Face models are free to download, deploying them often incurs costs. Using SageMaker Serverless Inference can minimize these costs, as you only pay for the actual use of the inference endpoint, not its uptime.
The combination of Hugging Face models and SageMaker Serverless is a boon to machine learning enthusiasts everywhere, whether you are a seasoned machine learning engineer discovering newly released models or a beginner trying to get your feet wet in machine learning.
Goal: Create a Named Entity Recognition (NER) on Amazon SageMaker Serverless Inference
In this article, we will deploy a Hugging Face model on Amazon SageMaker Serverless Inference. We will deploy dslim/bert-large-NER, a Named Entity Recognition (NER) model that can recognize types of entities with names in a given body of text, namely: location, organizations, person, and miscellaneous.
We will also create a Django app that utilizes this inference endpoint to give us a good visual representation of the parsing that our model can do on some given text.
You can try it out for yourself here: https://tutorial-sagemaker-huggingface.demo.klaudsol.com/
Here is a sample text that you can input if you can't think of anything top-of-head:
A robust named entity recognition system can automatically scan text and accurately identify key entities such as locations like Paris or Mount Everest, organizations such as United Nations or Google, persons like Ada Lovelace or Warren Buffet, and miscellaneous entities, which include nationalities, events, or works of art, like Japanese, Olympics, or The Starry Night. By classifying these entities, the system helps turn unstructured text into structured insights, enabling applications like news categorization, customer feedback analysis, and information retrieval from large documents.
If your curiosity is mounting, let's begin!
1. Select a Hugging Face Model to Deploy

Head to the Hugging Face Models Hub and browse from over 1.5 million machine learning models (as of writing) to choose from. You're free to try out and test whatever fancies your need or curiosity - translation, text processing, text-to-speech, image-to-text, and the like.
Just to manage expectations and prevent disappointments though - not all models here can be effectively hosted as serverless. The reason is that serverless inference impose hard resource constraints, such as 6GB max on memory, and so on. This shall be discussed in full detail later.
The caveat, though, is that there is no easy way to identify on the get-go which models would run effectively as serverless unless actually deployed. However, just keep in mind that the smaller the total file size of the model is, the higher the chance of it being compatible with serverless inference.
As mentioned already, we choose dslim/bert-large-NER for this guide.
2. Create a Jupyter Notebook
Deployment to SageMaker is best done via a combination of Bash and Python scripts, as many configurations are only available via scripts and not on the AWS console. It is then best to use a Jupyter Notebook either on your local machine or on the cloud via SageMaker Notebook Instance.
In this guide, we'll use a SageMaker Notebook Instance, but feel free to try running a Jupyter Notebook locally if you feel that your internet bandwidth and disk space are up to the task.
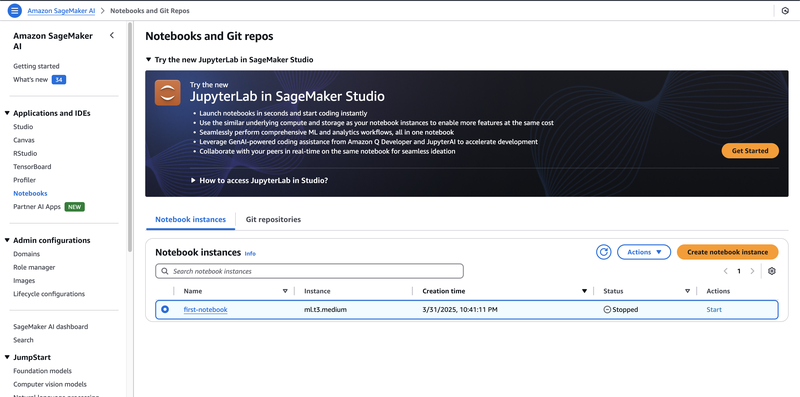
- Go to the services search bar on the upper left corner of the screen, and type "Amazon SageMaker AI"
- Under "Applications and IDEs", select "Notebooks"
- Click "Create Notebook Instances."
- You can choose the smallest notebook instance available for the purpose of this guide (i.e.,
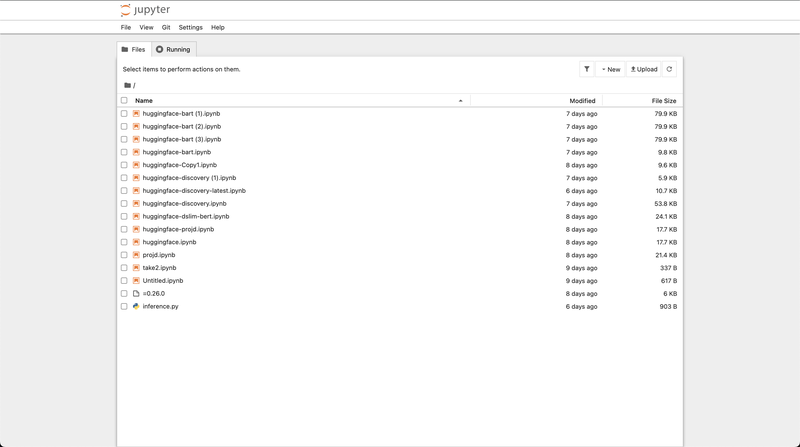
ml.t3.medium) - Once created, click on the "Actions" button, and click "Open Jupyter". A new tab will open to see a list view on your notebook instance.
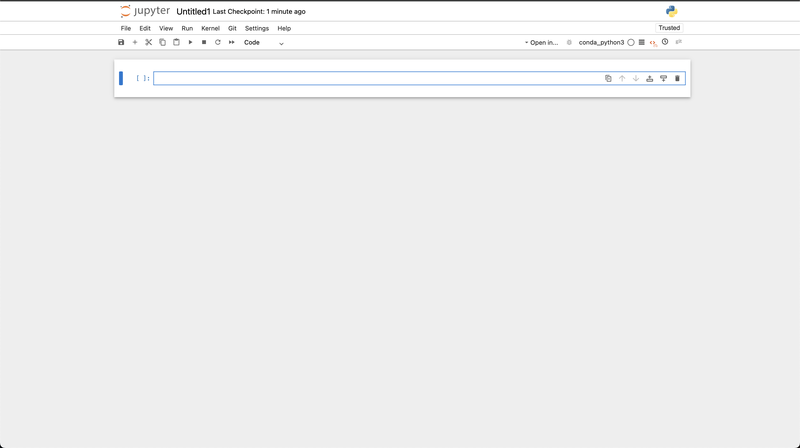
- Create a new Notebook by going to File > New > Notebook
- If asked for a kernel, select "conda_python3".
You're Jupyter notebook is ready for action.
Don't forget to stop the instance after usage and prevent doing the same mistake that I did and shoulder unnecessary cloud expenses.
3. Prepare the Hugging Face Model
Issue the following commands to our newly minted Jupyter notebook.
You can also directly download the notebook document here: https://github.com/ardeearam/tutorial-sagemaker-huggingface/blob/main/summary.ipynb
%%bash
pip install transformers torch sagemaker
We install transformers to access the Hugging Face models and to operate on them.
Behind the scenes, dslim/bert-large-NER needs pytorch to work, so we also install it. Finally, we need the sagemaker module for the configuration and deployment.
import os

model_name = "dslim/bert-large-NER"
s3_bucket = "sagemaker.demo.klaudsol.com"

sanitized_model_name = model_name.replace("/", "-")

#We define the model on both Python and Bash to easily switch between them
os.environ["MODEL_NAME"] = model_name
os.environ["SANITIZED_MODEL_NAME"] = sanitized_model_name
os.environ["S3_BUCKET"] = s3_bucket
We define our variables here and make them available on both Python and Bash.
Making the model_name a variable would make it easy for us to discover new models from Hugging Face by simply replacing this value and running the rest of the script as-is.
Supply your own S3 bucket here.
from transformers import AutoTokenizer, AutoModelForTokenClassification
import torch

# Load model and tokenizer
model = AutoModelForTokenClassification.from_pretrained(model_name)
tokenizer = AutoTokenizer.from_pretrained(model_name)

# Save the model locally
model.save_pretrained("model")
tokenizer.save_pretrained("model")
Here, the transformer library gets the model and tokenizer from the Hugging Face hub and serializes them into the model folder of our Jupyter notebook.
Note that AutoModelForTokenClassification is specific to token classification tasks (in our case, named entity recognition). Use the appropriate class based on the task that your Hugging Face model, is designed to do, such as:
AutoModelForSequenceClassification- Classify entire input sequence (e.g. Sentiment analysis, topic classification)AutoModelForQuestionAnswering- Predict span of text that answers a question (e.g. SQuAD-style QA)AutoModelForSeq2SeqLM- Sequence-to-sequence language modeling (e.g. Translation, summarization)AutoModelForCausalLM- Causal (autoregressive) language modeling (e.g. Text generation, GPT models)AutoModelForImageClassification- Image classification
When in doubt, refer to the Hugging Face model card of your particular model to know which model class to use.
%%bash
tar -czvf $SANITIZED_MODEL_NAME.tar.gz -C model .
aws s3 cp $SANITIZED_MODEL_NAME.tar.gz s3://$S3_BUCKET/
rm $SANITIZED_MODEL_NAME.tar.gz
rm -rf model
SageMaker needs to read our model files from S3, so we create a gzipped tarball of the contents of our model directory and upload it to S3.
from sagemaker.huggingface import HuggingFaceModel
import sagemaker

#This only works for SageMaker Notebook Instance.
#You need to figure out your execution role manually if you are running locally.
role = sagemaker.get_execution_role()

model_uri = f"s3://{s3_bucket}/{sanitized_model_name}.tar.gz"

hf_model = HuggingFaceModel(
    model_data=model_uri,
    role=role,
    transformers_version="4.26",
    pytorch_version="1.13",
    py_version="py39"
)
The outcome of this step is an initialized HuggingFaceModel hf_model with the proper S3 path to our compressed tar model, and the execution role that SageMaker will use during inference. The SageMaker execution role is the set of permissions that you grant SageMaker as it performs operations such as inference.
If you are using a SageMaker Notebook Instance, then Sagemaker can retrieve this for you automatically via sagemaker.get_execution_role()
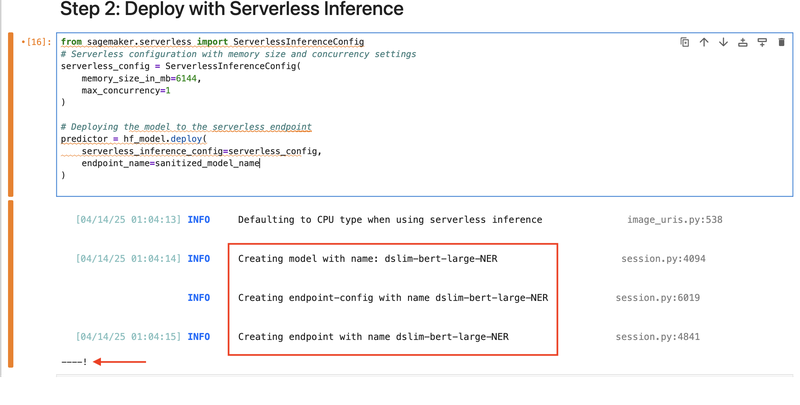
4. Deploy with Serverless Inference
from sagemaker.serverless import ServerlessInferenceConfig
# Serverless configuration with memory size and concurrency settings
serverless_config = ServerlessInferenceConfig(
  memory_size_in_mb=6144,
  max_concurrency=1
)

# Deploying the model to the serverless endpoint
predictor = hf_model.deploy(
   serverless_inference_config=serverless_config,
   endpoint_name=sanitized_model_name
)
Once we have a proper HuggingFace model, we must create an endpoint configuration that requests for the need for serverless inference for deployment. We do this via ServerlessInferenceConfig.
Serverless Inference Config Parameters
Here are some important parameters that we need to be aware of:
memory_size_in_mb
This is the memory allocated to the endpoint. We must understand that the maximum we can use here is 6144MB or 6 GB.
Also note that memory_size_in_mb is not a continuous number, but rather a limited number of preset options. The available choices are 1024 MB, 2048 MB, 3072 MB, 4096 MB, 5120 MB, or 6144 MB.
max_concurrency
This is the total number of invocations that the endpoint can handle at the same time.
Note that aside from a per-endpoint concurrency limit, there is also a quota called "Maximum total concurrency that can be allocated across all serverless endpoints." As the name suggests, this is the limit on the sum of all max_concurrency on all endpoints across all accounts. On new AWS accounts, this is set to 10. This is worth noting as you'll hit this low limit almost immediately if you are not mindful of the max_concurrency value of each of your endpoints.
For new AWS accounts, it's better to set max_concurrency to 1, especially on sandbox / experimental endpoints, to budget the max_concurrency total value.
Another thing that you can do is head to Service Quotas > AWS Services > Amazon SageMaker and look for "Maximum total concurrency that can be allocated across all serverless endpoints."

Hit "Request increase at an account level", and provide a new value (preferably way bigger than 10). Note that the request is not granted real-time, and it may take 2 - 3 business days before it is granted. Better plan ahead and take this into your timeline.
Deployment
Running hf_model.deploy() triggers the creation of three resources, namely a model, an endpoint configuration, and an endpoint. The deployment process takes a bit of time, roughly around 3 - 5 minutes. On the lower left portion of the cell of your Jupyter notebook, you can see a makeshift progress bar that shows a "-" when something is still happening in the background, and a "!" when the processing is fully complete.
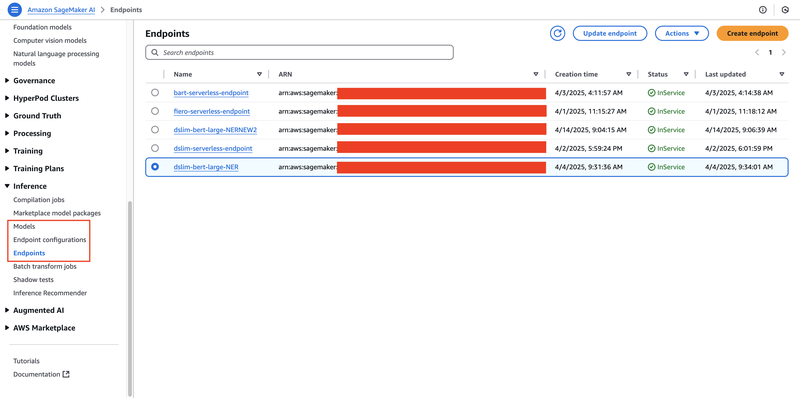
Also, you can check the AWS Console and see the status of the deployment of these three resources.
Testing
Once deployed, we now get to see our machine learning model in action. Invoke predictor.predict() to see the behavior of your recently deployed model.
data = {
   "inputs": "Hello, I am Pedro Penduko. You can call me Pedro. I live in Manila. I am a member of Data Engineering Pilipinas."
}

response = predictor.predict(data)
print(response)
If the machine learning gods are on our side, then we shall see a JSON output similar to this (needless to say, the shape of the output is on a per-model basis, so your mileage may vary):
[
  {'entity': 'B-PER', 'score': 0.99814772605896, 'index': 5, 'word': 'Pedro', 'start': 12, 'end': 17},
  {'entity': 'I-PER', 'score': 0.9987749457359314, 'index': 6, 'word': 'Pen', 'start': 18, 'end': 21},
  {'entity': 'I-PER', 'score': 0.9955814480781555, 'index': 7, 'word': '##du', 'start': 21, 'end': 23},
  {'entity': 'I-PER', 'score': 0.978586733341217, 'index': 8, 'word': '##ko', 'start': 23, 'end': 25},
  {'entity': 'B-PER', 'score': 0.9981096982955933, 'index': 14, 'word': 'Pedro', 'start': 43, 'end': 48},
  {'entity': 'B-LOC', 'score': 0.9991441965103149, 'index': 19, 'word': 'Manila', 'start': 60, 'end': 66},
  {'entity': 'B-ORG', 'score': 0.9981166124343872, 'index': 26, 'word': 'Data', 'start': 85, 'end': 89},
  {'entity': 'I-ORG', 'score': 0.9954492449760437, 'index': 27, 'word': 'Engineering', 'start': 90, 'end': 101},
  {'entity': 'I-ORG', 'score': 0.998347282409668, 'index': 28, 'word': 'Pi', 'start': 102, 'end': 104},
  {'entity': 'I-ORG', 'score': 0.9868834614753723, 'index': 29, 'word': '##lip', 'start': 104, 'end': 107},
  {'entity': 'I-ORG', 'score': 0.9973872303962708, 'index': 30, 'word': '##inas', 'start': 107, 'end': 111}
]
As you can see, the model correctly identified "Pedro Penduko" as a person's name, "Manila" as a location name, and "Data Engineering Pilipinas" as an organization name. The actual format is a bit raw, though, and we need to process it further to be useful to applications.
5. Create an app that accesses the endpoint
Let's create a basic Django app that does the following:
- Accepts a body text from a textarea, and submits the body to our inference endpoint;
- Display the result of our NER backend, and highlight appropriately the named entities. We distinguish the classification of the entities with colors, and we also add a tooltip to the entities to display the classification of such entity.
Note that we are aiming for simplicity in this demonstration, and we go away with the complex React / Redux / Webpack / Babel / TypeScript / Svelte / Bun / NewfangledCoolJSThang and opt for a more traditional and simpler jQuery-based frontend. We can certainly modify the codebase for modern JavaScript frameworks, but it would dilute the points that this guide wants to drive.
Let's inspect some of the important parts of this Django app. You can inspect the full source code here: https://github.com/ardeearam/tutorial-sagemaker-huggingface
#/app/lib/sagemaker.py
import json
import boto3
from django.conf import settings


class SageMakerRuntime:
    def __init__(self):
      self.client = boto3.client("sagemaker-runtime")

    def invoke_endpoint(self, payload):
      endpoint_name = settings.SAGEMAKER_ENDPOINT_NAME
      response = self.client.invoke_endpoint(
          EndpointName=endpoint_name,
          ContentType="application/json",
          Body=json.dumps(payload)
      )

      return json.loads(response["Body"].read().decode())
app/lib/sagemaker.py is the heart of our Django app. Using boto3's sagemaker-runtime client, we access our created endpoint and pass the content of our text area to our inference endpoint.
The output would be tokens (subwords) that need to be combined to form a whole word, with the classification, start index, and index. These are essential for us to do the highlighting of the named entity found in our body of text.
#app/lib/processor.py
def combine_tokens(ner_output):
    results = []
    current_entity = None

    for token in ner_output:
        #print(token)
        entity_type = token["entity"].split("-")[-1]
        word = token["word"].replace("##", "")

        if token["entity"].startswith("B-") or current_entity is None or current_entity["entity"] != entity_type:
            # Start of new entity
            if current_entity:
                results.append(current_entity)
            current_entity = {
                "entity": entity_type,
                "value": word,
                "start": token["start"],
                "end": token["end"]
            }
        else:
            # Continuation of current entity
            if token["word"].startswith("##"):
              # token is part of the same word
              current_entity["value"] += word
            else:
              current_entity["value"] += " " + word
            current_entity["end"] = token["end"]

    # Append the last entity
    if current_entity:
        results.append(current_entity)

    return results
This algorithm combines the token-based output of our ML model as "words," which we can work on better. A "B-" prefixed token signifies the start of the word, and succeeding "I-" prefixed tokens are concatenated to the word (after removing the "##" prefix) until another "B-" token is encountered, signaling that the incoming token is not part of this word, but the start of another.
We also extract the entity_type (i.e., PER, LOC, ORG, or MISC) so that we can color-code it and add the tooltip later.
#app/lib/processor.py
def tag_text(text, tags):
    for tag in tags:
        entity = tag["entity"]
        value = tag["value"]

        # Replace the text with the tagged version
        text = text.replace(value, f"<span class='{entity} entity' alt='{entity}' title='{humanize_tag(entity)}'>{value}</span>")

    return text
tag_text is a simple method that surrounds the entity that the model found with span tags. This allows us to control the visual output through CSS.
#app/view.py
from django.http import HttpResponse
from django.shortcuts import render
from app.lib.sagemaker import SageMakerRuntime
from app.lib.processor import combine_tokens, tag_text
from pprint import pprint
import json


def home(request):
  if request.method == 'GET':

    return render(request, 'app/index.html', {})

  # POSTback (old school)
  # We can do AJAX style, but it will make this tutorial
  # more complicated than it should be.
  elif request.method == 'POST':

    query = request.POST.get('query')
    sagemaker_runtime_client = SageMakerRuntime()
    response = sagemaker_runtime_client.invoke_endpoint({"inputs": query})
    print(response)

    message = tag_text(text=query, tags=combine_tokens(response))

    return render(request, 'app/index.html', {
      'query': query,
      'message': message
    })
Our Django view app/view.py holds everything together neatly. We opted out of fancy AJAX and chose a more direct and traditional postback approach, again for simplicity and ease of demonstration.
Our view displays app/index.html initially, which is nothing more than a page with a text area and a button for submission.
Upon postback, we deliver the data from the text area directly into the SageMaker Serverless Inference endpoint we just created a few steps back. We did some post-processing operations on the response of our machine learning model, such as combine_tokens and tag_text, after which we will render back app/index.html.
Check out https://tutorial-sagemaker-huggingface.demo.klaudsol.com/ to see our Django application accessing our machine learning model as a serverless Sagemaker endpoint.
Costs
Does hosting on SageMaker Serverless cost less than a burger? Let's find out.
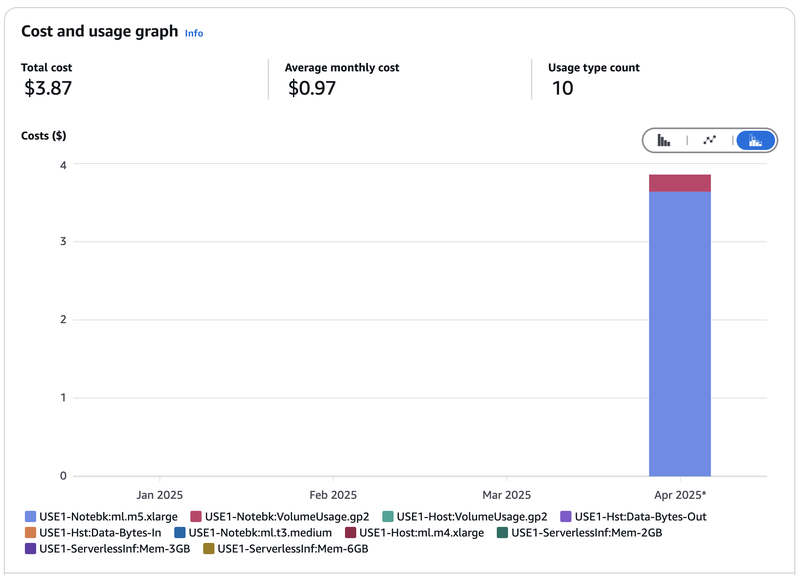
I started writing this article and creating SageMaker experiments around the first week of March 2025, so it's best if we observe just how much are we billed from March to April 2025. Let's throw in the January and February bill as well just for comparison, and we see a total of $3.87. Let's zoom in for more detail:
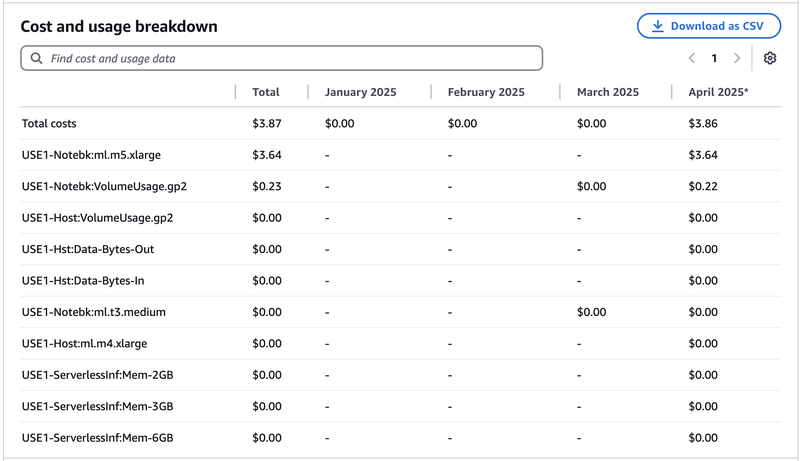
The breakdown reveals that the costliest (94% in fact) part of the bill is the ml.m5.xlarge notebook I have spun and stupidly forgot to turn off for 24 hours (doh).
You will also notice that the instance ml.m5.xlarge is a lot larger than the recommended ml.t3.medium in this article. The real reason behind this is I was initially more ambitious and was trying to make facebook/bart-large run on serverless inference (spoiler: it did not work). The model was so enormous that it made ml.t3.medium cry and die of misery. Spinning up ml.m5.xlarge was unfortunately just as pointless since Bart cannot run on 6 GB of memory alone. In frustration, I may have forgotten to turn off my SageMaker notebook instance.
We can argue that $3.64 is an outlier, and the costs that matter here are the ml.t3.medium (which is 0), the serverless inferences (which is 0), and the Notebook Volume, which is $0.22, for a grand total of $0.22.
Excuses aside, let's see how much a burger is in the US today. According to this CNN article May 2024, the average cost of a Big Mac is $5.29, which is still 62% more than the $3.27 bill that we have.
Our claim that hosting on the SageMaker Serverless costs less than the price of burger still holds, slipups and all.
Caveats on SageMaker Serverless Inference
As wonderful as a serverless AI endpoint sounds, it is not an end-all be-all solution. As with any other engineering solution, there are some limitations of SageMaker Serverless Inference that we need to keep in mind to know where and when it's best to use.
Memory Limitations
We can allocate up to 6 GB of RAM for our SageMaker endpoint. This automatically filters out heavy LLMs out there, such as DeepSeek, Gemini, Llama, GPT4, and even Mistral.
We can, however, deploy lightweight NLPs, sentiment analysis models, and theoretically we can even deploy TinyLlama (not yet sure about this, might be a topic for another article). For people working around this area, then a serverless AI solution is fantastic.
Cold Starts
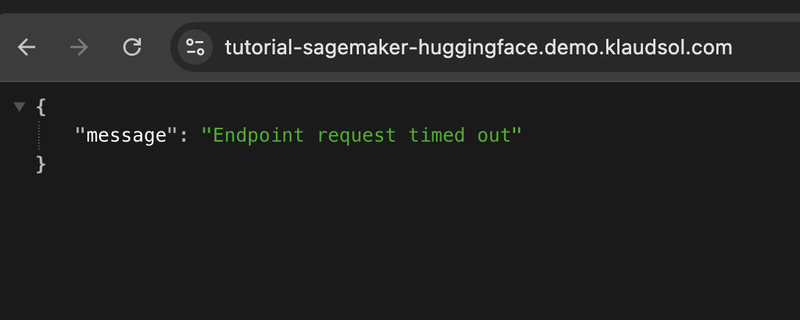
Another limitation are cold starts, which is a limitation inherited from it being built on a serverless infrastructure. When dealing with serverless, the client should always expect that the endpoint will not be able to respond immediately, especially if the intervals between calls are few and far between.
We deal with this similarly to how we deal with cold starts on other serverless solutions: we either program our client to retry (with exponential backoff) until the endpoint is up, or we set up a regular invocation (that is, regular ping) to the endpoint to keep the endpoint warm.
Conclusion
Creating your AI-powered solutions has never been as cheap and easy, thanks to the increasing availability of serverless and AI technologies to us. This is the perfect time to go and build solutions that make life easier and better for all of us!
Happy coding!