How to make a Retrieval Augmented Generation (RAG) solution quickly with Amazon Bedrock and Django
Let's build a simple RAG solution using Bedrock and Django. This is a great introductory project when trying to learn more about Large Language Models and AI Integration.

RAG, short for Retrieval Augmented Generation, is the process of allowing Large Language Models (LLMs) such as OpenAI GPT, Claude Sonnet, or Meta Llama to access data outside of their initial training.
LLMs are typically trained on publicly available data from the internet and other offline sources. While useful in many scenarios, it has limited value for private data unseen by our LLMs, like confidential process documents, corporate training materials, and internal databases.
RAG is a great way to extend our LLM with private document knowledge, enabling personalized intelligent systems tailored to our business.
RAG also enhances the topic depth and reduces made-up responses (a.k.a. "hallucinations") by providing accurate information, as LLMs often have broad but shallow knowledge due to the nature of their training data.
Goal: Create a Philippine Civil Code Expert Chatbot
In this guide, we will create a basic chatbot with extended knowledge of the Civil Code of the Philippines. We specifically chose this document for this guide as it is a publicly available document that can be obtained and replicated by anyone without facing any intellectual property concerns.
Although one can argue that LLMs are trained in some broad aspect of the Philippine civil code, I'd wager that it wasn't trained for every specific article in the civil code — this is where RAG will help.
The steps remain exactly the same when using your own private documents.
Our Civil Code Expert Chatbot must be able to do the following:
- Accept questions regarding the Civil Code of the Philippines in plain English.
- Answer the questions factually and professionally.
- Provide reference to the Civil Code to support its response.
We shall use Amazon Bedrock Knowledge Bases to implement our RAG chatbot.
For those who love spoilers, the live site can be found here: https://django-bedrock.demo.klaudsol.com/
Let's begin!
1. Prepare Amazon Bedrock Knowledge Bases
The first step is to set up an Amazon Bedrock Knowledge Base. This service helps us implement a RAG solution faster by providing us with a working RAG framework and abstracting a lot of necessary but boilerplate processes, such as document chunking, vector database sync, and text embedding management — we'll discuss these in detail later.
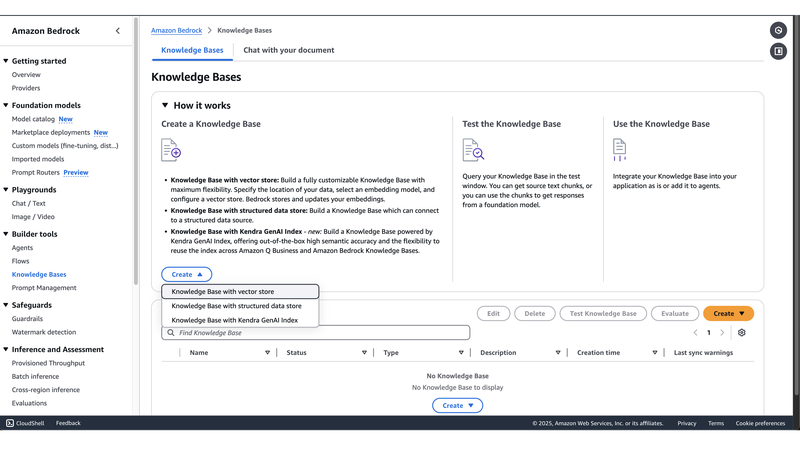
Head to your Amazon Web Services Console. On the search bar on the top left portion of your screen, type "Bedrock". Click on the link to "Amazon Bedrock" to reach the Bedrock Console.
On the leftside menu panel, click "Builder Tools > Knowledge Bases". You will see the screen above.
Click "Create > Knowledge Base with vector store".
1.1 Provide Knowledge Base Details
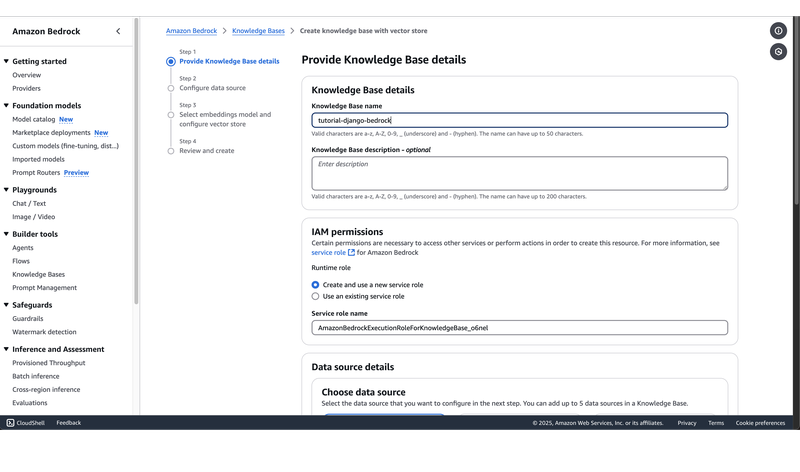
We complete only the required fields or those needing changes, skipping or using defaults whenever possible to make the process fast and easy.
- Knowledge Base name - name to your heart's desire.
- IAM permissions - Choose "Create and use a new service role"
- Choose data source - Select S3. This is the easiest to implement and the cheapest data source available.
Hit the Next button.
1.2 Configure Data Source
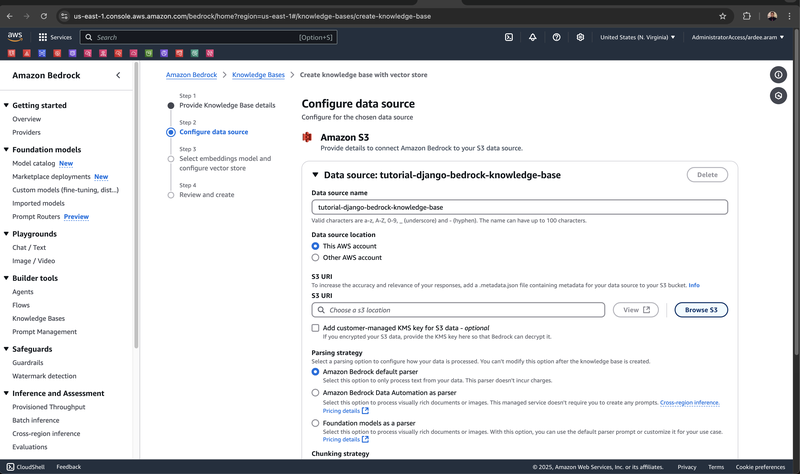
We configure our S3 Data Source in this step.
- Data Source Name - Again, choose a name that you think is best.
- S3 URI - Choose an S3 bucket where we will upload and read our data source. Ensure that it is a private bucket as not to be publicly accessible. If you haven't created a private S3 bucket yet, now is the time to create one.
- Parsing Strategy - Since we are dealing with pure text in this demo project, it is sufficient to use the Amazon Bedrock default parser. Consider otherwise if you are dealing with data sources such as PDFs or PNG files.
- Chunking Strategy - Our documents will be stored not only as plain text but as vectors as well — a long array of real numbers that represent meaning. We do not rely on substrings to say that this sentence is similar, for example, "car" to "car dealership". A vector database allows searches such as "car" to return a sentence with "I love this truck". Chunking is necessary to create subdocuments that refer to the same topic. Normally, a safe choice is Default Chunking, which chunks our documents into subdocuments with (more or less) equal parts. This works well with documents that revolve around one topic in general. However, we opt to do the chunking ourselves in this demo project (as we will see later), so we choose No chunking. Bedrock will create embeddings of the whole subdocument, trusting that we already did a proper job of chunking beforehand.
We hit the Next button.
1.3 Select Embeddings Model and Configure Vector Store
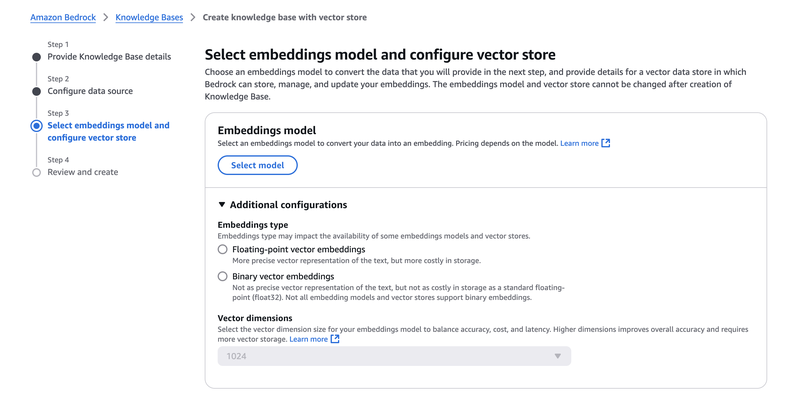
As discussed prior, we convert our plain text documents into an array of real numbers that represent meaning. This is called an embedding.
We use a text embedding model such as Cohere Embed to convert a body of text into an embedding.
We use a vector database such as Pinecone to store this embedding and to decide which of the other embeddings in this database are "similar" and "share the same meaning".
1.3.1 Select Cohere Embed Multilingual as our embeddings model
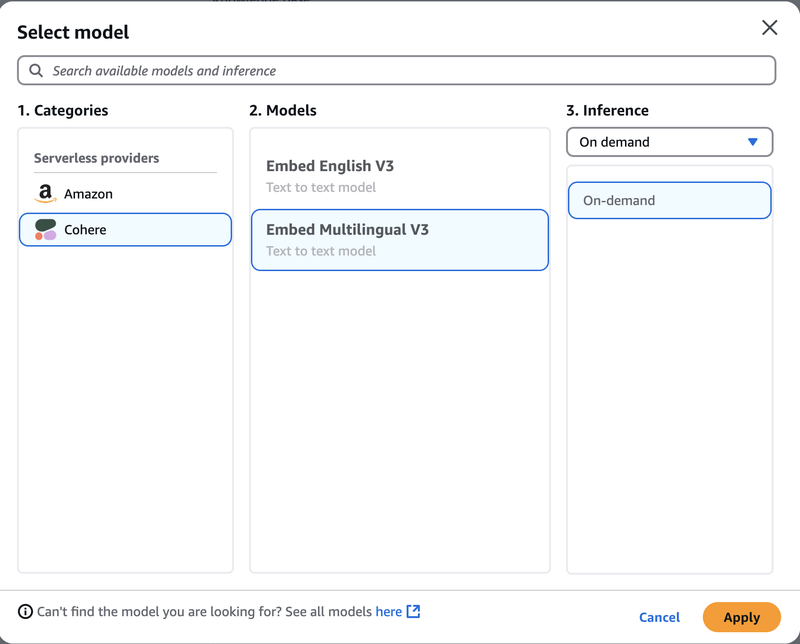
I chose Cohere Embed because Embed performs better than Amazon Titan during testing. The citations returned by Embed are more relevant to me than those returned by Titan.
If Cohere is not available in your account, now is the time to enable it.
1.3.2 Create a Pinecone account and retrieve the Endpoint URL and API Key
I chose Pinecone as it is the only real, scalable-to-zero serverless vector database solution in the selection. My primary concern is cost, and I want to get away with as little money being shelled out as possible, both upfront and every month.
Pinecone's free Starter Plan allows 2GB of storage, 1M/month read units, and 2M/month write units, which I estimate would suit this tutorial and future tutorials on the topic.
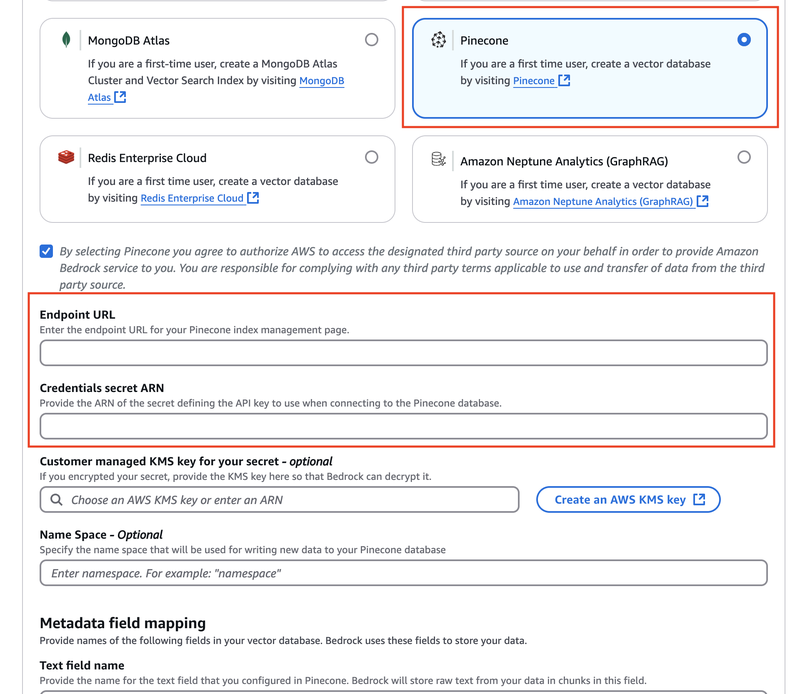
When we select Pinecone, we need to provide the Endpoint URL and Credentials Secret ARN, which we will do in a bit.
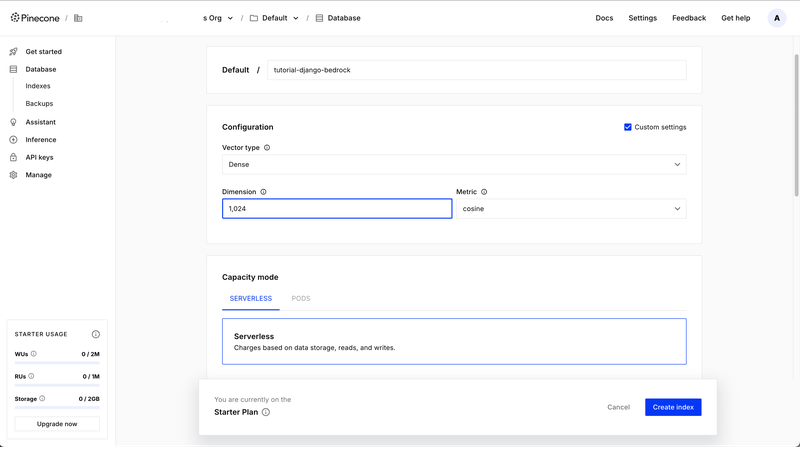
Go to https://www.pinecone.io/ and sign up for a free account.
Click "Create Index".
Provide a suitable name for the database index.
Click the "Custom Settings" checkbox for us to define the parameters exactly, and not rely on preset values.
- Vector Configuration - Choose Dense. We use dense vector types for semantic search.
- Dimension - choose 1024 for this to be compatible with Cohere Embed.
- Metric - Choose the default (cosine similarity).
- Capacity Mode - Ensure that it is on "Serverless".
Click "Create Index".
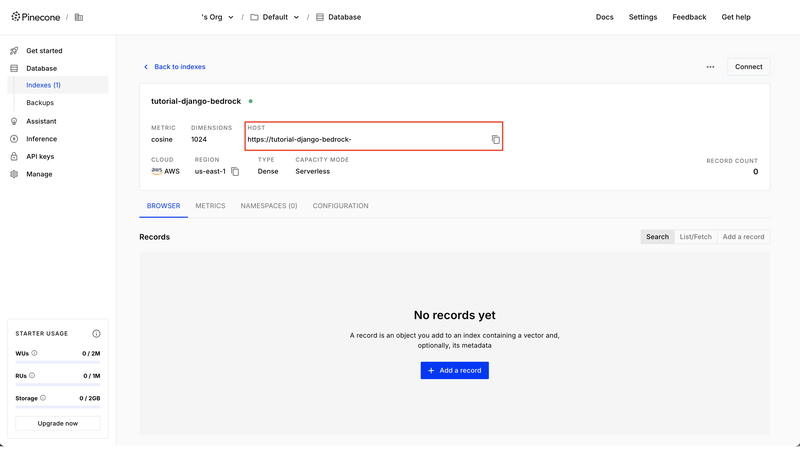
Once we click the "Create Index" button, we will return to the home page of our newly created vector database. Get the value in the Host heading — we will use it as our Endpoint URL.
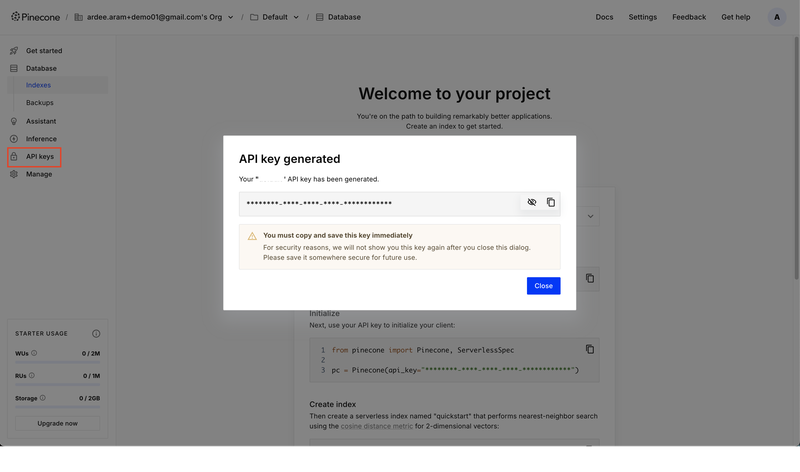
We need to perform several steps to obtain the Credentials Secret ARN. First, we need to get an API key from Pinecone.
On the lefthand sidebar of Pinecone, go to "API Keys > Create API Key". For security reasons, however, we do not paste this API key unencrypted. We use AWS Secrets Manager to ensure that our key is properly encrypted and out of reach of unauthorized individuals.
1.3.3 Place the Pinecone API Key in the AWS Secrets Manager
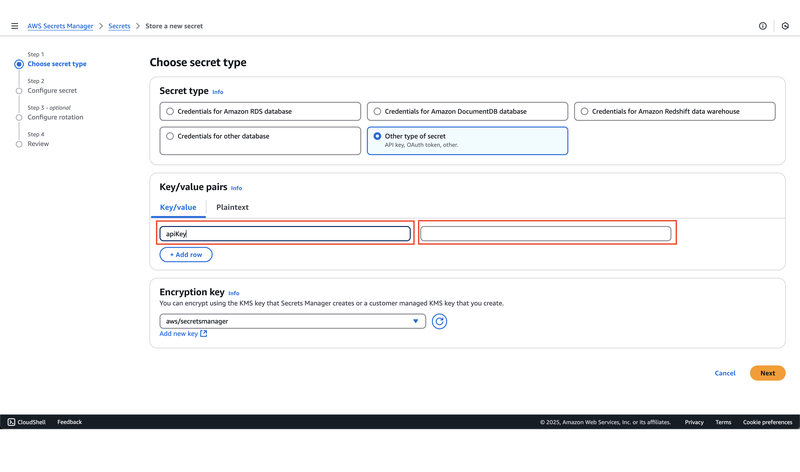
We go back to our AWS Console in a new tab. Do not touch the Bedrock tab for now. Search for "Secrets Manager" on the top-left search bar.
Click "Store New Secret". Choose "Other type of secret" for the Secret Type.
For the "key" part in the "Key/value pair", type "apiKey".
For the "value" part, copy and paste the API key obtained from Pinecone. Click Next.
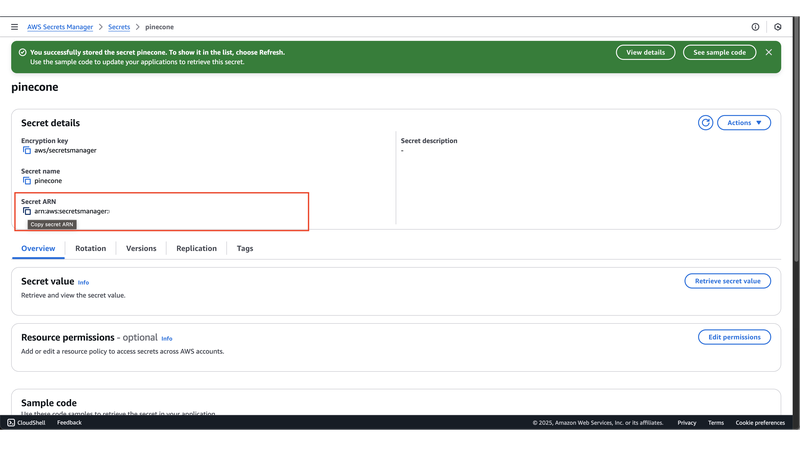
If successful, we will be presented with a Secret ARN. Use this as the Credentials Secret ARN.

Go back to our tab with the Bedrock Console open, and provide the values we have just obtained.
1.3.4 Configure Metadata field mapping

Any values work here. The values text and metadata work fine.
1.4 Review
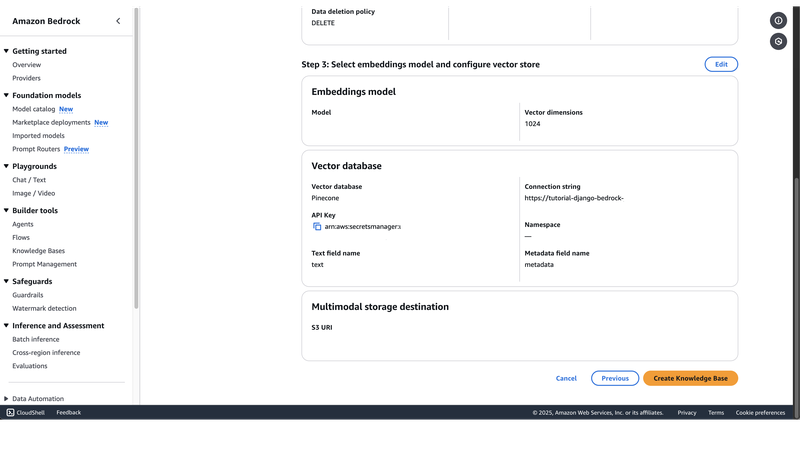
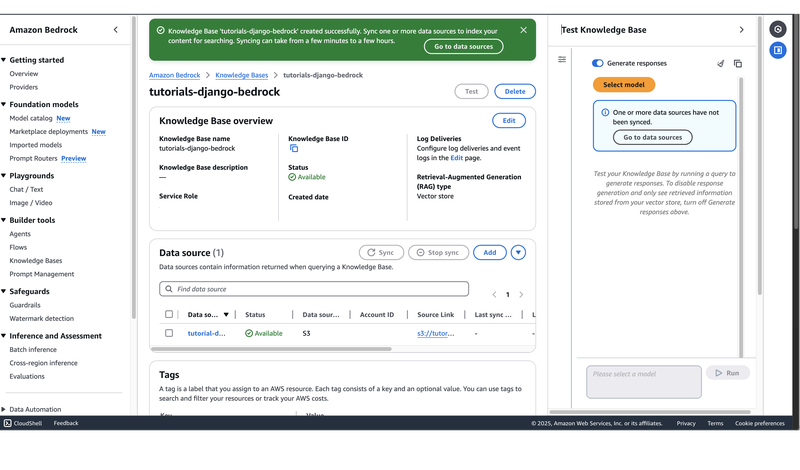
The last page is simply a page where you review the previous configuration choices. Click "Create Knowledge Base" when entirely satisfied.
Full size 🔍
Success! We have created our RAG system with Amazon Bedrock. However, this is not fully workable nor testable unless we provide it with data to ingest, which is what we will do shortly.
2. Prepare and Upload Data
Once our Bedrock Knowledge Base is all set up, we feed it with our document/s.
2.1 Download and Sanitize Data
# url_to_text.py
import requests
from bs4 import BeautifulSoup
import sys

def url_to_text(url):

  response = requests.get(url)
  soup = BeautifulSoup(response.text, "html.parser")
  return soup.get_text(separator="\n\n", strip=True)

if __name__ == "__main__":

  url = sys.argv[1]
  print("Crawling and cleaning ", sys.argv[1], "...", file=sys.stderr)
  print(url_to_text(url))
https://github.com/ardeearam/tutorials-django-bedrock/blob/main/app/lib/url_to_text.py
We use url_to_text.py to retrieve a copy of the Civil Code of the Philippines from Lawphil.net and strip off all markups. Our knowledge base works better if fed with pure text. We use BeautifulSoup to sanitize our content and strip off all markups.
mkdir -p knowledge_base
python url_to_text.py https://lawphil.net/statutes/repacts/ra1949/ra_386_1949.html > knowledge_base/ra386.txt
We run the script and save the resulting text into knowledge_base/ra386.txt.
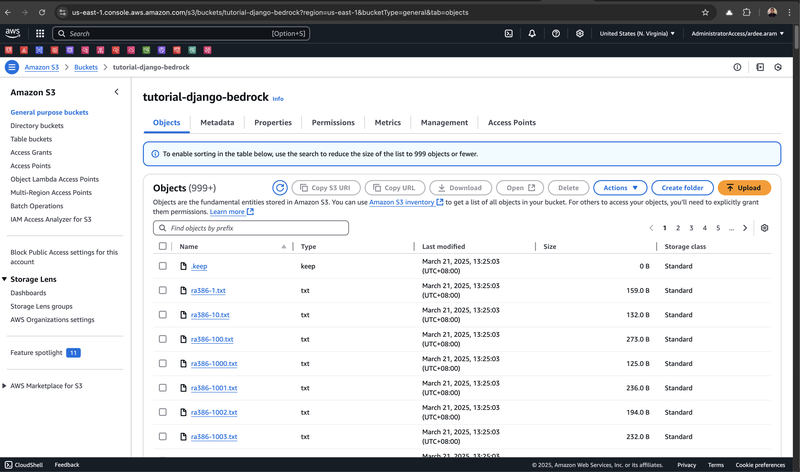
At this point, we can choose to upload knowledge_base/ra386.txt directly to our S3 knowledge base data source and leave the chunking of data to Bedrock. However, after a bit of experimenting with this particular demo, I found that the results were more accurate if we do the chunking ourselves, and split the document into separate legal articles.
(Optional) 2.2 Manually Chunk Data
Manually splitting our document works well in this specific scenario since the document follows a certain structure (i.e., it is composed entirely of multiple legal articles preceded by an article header, e.g., "Article 17"). It is then not difficult to split the whole document using these article headers using regular expressions.
The resulting reference list will be cleaner and more understandable as each reference will point to a single article.
# split_act_into_articles.py

import re
import sys
import time
import os

def split_document_stream_using_pattern(filepath, pattern):
    buffer = ''
    article_buffer = ''
    with open(filepath, 'r') as file:
        for line in file:
            buffer += line
            matches = re.split(pattern, buffer, maxsplit=1, flags=re.MULTILINE)
            if len(matches) > 1:
              yield article_buffer + "\n" + matches[0].strip()
              article_buffer = matches[1]
              buffer = ''
        if buffer.strip():
            yield buffer.strip()  # Yield the final part if there's leftover content

if __name__ == "__main__":

  source = sys.argv[1]
  output_directory = sys.argv[2]

  pattern = r'(?=\bArticle \d+[.]?)'
  for idx, subdoc in enumerate(split_document_stream_using_pattern(source, pattern), start=1):
    print("-" * 30)
    basename, ext = os.path.splitext(os.path.basename(source))
    subdocument_name = f"{basename}-{idx}{ext}"
    subdocument_fullpath = os.path.join(output_directory, subdocument_name)
    print(f"Subdocument {subdocument_fullpath}:\n")
    print(f"{subdoc[:100]}...")

    with open(subdocument_fullpath, 'w') as file:
file.write(subdoc)python split_act_into_articles.py knowledge_base/ra386.txt knowledge_baseRunning the script above would generate multiple files inside the knowledge_base folder. We then upload all of these files to S3.
2.3 Upload Data
cd knowledge_base
rm ra386.txt
aws s3 cp . s3://tutorial-django-bedrock --recursive --profile demo01
cd .. #Go back to our project root
We use AWS CLI (Command Line Interface) to upload our subdocuments into S3. I'm using the demo01 profile configured in my command line, but you must replace this and provide a properly configured profile for your account.
Note that we remove the parent document first to prevent the display of redundant references.
We can check on our S3 console to see if all the files are indeed there.
2.4 Sync Data Source
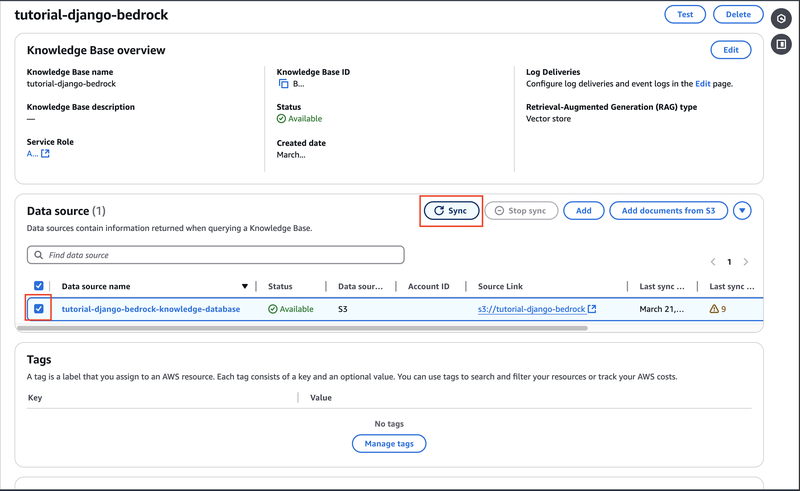
We head back to Bedrock Console and sync our data source. Note that it may take a couple of minutes, so if you need a break, now is the perfect time to do so.
3. Test Knowlege Base via Console
With our Bedrock configuration and data all set, it's time to check whether everything has been set up correctly so far.
- Click the "Test" Button found in the upper-right corner of the Amazon Bedrock Console. The "Test Knowledge Base" panel will appear to the right.
- Click "Select Model". For this guide's purpose, select "Anthropic > Claude 3.7 Sonnet v1" as our text generative model, and select "Cross Region > US Anthropic Claude 3.7 Sonnet" for inference. If this is disabled on your account, you need to enable this model first.
- You may now ask it with a factual question with an answer that can be found in the document. In this scenario, let's try the following question:
"According to the Philippine Civil Code, what is the marrying age of females?"
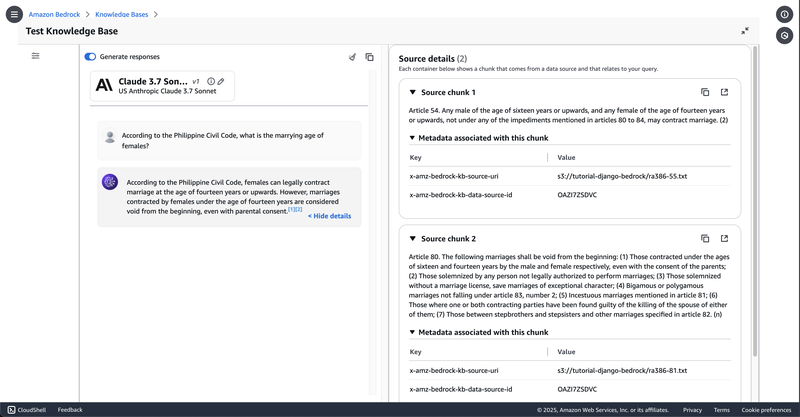
It responded: "According to the Philippine Civil Code, females can legally contract marriage at the age of fourteen years or upwards. However, marriages contracted by females under the age of fourteen years are considered void from the beginning, even with parental consent".
I'm highly satisfied with this answer. Aside from returning with a factually correct answer (within the context of the Civil Code), it also retrieved the proper relevant articles supporting its response, namely Articles 54 and Articles 80. We now see the benefits of manually chunking our text via articles versus letting Bedrock parse it.
Recap on what we have so far
So far, we have several systems working together, all neatly orchestrated by Amazon Bedrock. We have:
- Amazon S3 for storage of our data sources;
- Cohere Embed Multilingual to generate text embeddings;
- Pinecone to store the generated vectors, and to facilitate concept search;
- Claude Sonnet to process the user query and the result of the Pinecone concept search to generate a coherent human-like response.
Integrating all of these technologies by hand is definitely non-trivial. Having Amazon Bedrock orchestrate these for us is a major productivity boost.
4. Write Django Code
Once we are confident that our Bedrock Knowledge Base works as intended, we now write the Django application that connects to our RAG solution.
4.1 Generate New Django Project
We begin with a vanilla Django setup.
mkdir tutorial-django-bedrock
cd tutorial-django-bedrock
python3 -m venv venv
source venv/bin/activate

pip install django django-environ boto3
pip freeze > requirements.txt

django-admin startproject app .
python manage.py runserver
Note that we also installed django-environ, which allows us to access environment variables in the .env file, and boto3, which allows us to perform API calls to AWS.
Visit http://127.0.0.1:8000/ on your local machine to check.
4.2 Create a Minimal Frontend
We create the simplest possible frontend that gets the job done. We provide a textbox for input, and a space both for the main response and the reference response. We opt for a traditional, non-AJAX postback solution to keep it simple and unobtrusive. We import as few front-end libraries as possible, wrote JavaScript in ES5 for maximum browser compatibility, and opted for DOM API when possible. So yeah, no fancy React/Redux/Webpack/Babel here.
One exception though is the typing animation that is so strongly associated with LLMs. Making it type ala ChatGPT using typed.js feels right to me.
<!doctype html>

<!-- app/templates/app/index.html -->

<html lang="en-us" dir="ltr">
  <head>
    <meta charset="utf-8">
    <title>Tutorial: Django + Amazon Bedrock</title>
    <meta name="viewport" content="width=device-width, initial-scale=1">
    <script src="https://cdn.jsdelivr.net/npm/typed.js@2.0.12"></script>
    <style>
      /* Snipped for brevity */
    </style>

<script type="text/javascript">

  //We write in ES5-compatible code so that it will run
  //on the widest array of browsers.
  //No fat arrow functions, sadly.

  function ready(fn) {
    if (document.readyState !== 'loading') {
      fn();
    } else {
      document.addEventListener('DOMContentLoaded', fn);
    }
  }

  function init() {

    var mainResponseOptions = {
      strings: [{{ message|safe }}],
      typeSpeed: 0.5, // Speed in milliseconds per character

      loop: false, // Loop the effect
      showCursor: false,
      onComplete: function() {

        document.querySelector('#header-references').style.display = 'block';

        //Display the resources only after the main response
        var referencesOptions = {
          strings: [{{ references|safe }}],
          typeSpeed: 0.5, // Speed in milliseconds per character
          loop: false, // Loop the effect
          showCursor: false
        }

        new Typed(document.querySelector('.main-references'), referencesOptions);
      }
    };

    new Typed(document.querySelector('.main-response'), mainResponseOptions);
  }

  ready(init);
</script>

  </head>
  <body>
    <main>
      <div class="main-input">
        <form method="POST">
          {% csrf_token %}
          <textarea name="query" placeholder="Ask anything about the Civil Code of the Philippines" rows="10">{{ query }}</textarea>
          <input type="submit" value="Ask" />
        </form>
    </div>

      <div class="main-response"></div>

      {% if references_count > 0 %}
      <h2 id="header-references">References:</h2>
      {% endif %}

      <div class="main-references"></div>
    </main>

  </body>
</html># app/views.py
from django.http import HttpResponse
from django.shortcuts import render
from app.lib.bedrock import Bedrock
from pprint import pprint
import json
def home(request):
if request.method == 'GET':
return render(request, 'app/index.html', {})
# POSTback (old school)
# We can do AJAX style, but it will make this tutorial
# more complicated than it should be.
elif request.method == 'POST':
query = request.POST.get('query')
bedrock_client = Bedrock()
response = bedrock_client.retrieve_and_generate(query)
message = response['output']['text']
citations = response["citations"]
retrieved_references = [citation["retrievedReferences"] for citation in citations]
#Flatten retrieved_references
flat_retrieved_references = [item for retrieved_reference_item in retrieved_references for item in retrieved_reference_item]
references = set([
f'''
<div>
<blockquote>...{flat_retrieved_references_item['content']['text']}...</<blockquote>
<cite>— {flat_retrieved_references_item['location']['s3Location']['uri']}</cite>
</div>
'''
for flat_retrieved_references_item in flat_retrieved_references
])
references_string = " ".join(references)
return render(request, 'app/index.html', {
'query': query,
'message': json.dumps(message),
'references': json.dumps(references_string),
'references_count': len(references)
})Our app/views.py contains our postback mechanism, plus some data unpacking and formatting code. Not too much logic code here — all of the heavy lifting is done by the Bedrock class, which we will see more about in a bit.
# app/urls.py

from django.contrib import admin
from django.urls import path
from .views import home

urlpatterns = [
    path('admin/', admin.site.urls),
    path('', home),  # <---
]
https://github.com/ardeearam/tutorials-django-bedrock/blob/main/app/urls.py
Map our home view to the root path in app/urls.py.
4.3 Add Backend Code
We now make the library that connects to our Bedrock Knowledge Base. Let's go back to the Bedrock class that we briefly touched a while ago.
# app/lib/bedrock.py

import boto3
import json
from django.conf import settings

class Bedrock:
  def __init__(self):
    self.client =  boto3.client("bedrock-agent-runtime", region_name=settings.BEDROCK_REGION)

  def retrieve_and_generate(self, query):

    kb_id = settings.BEDROCK_KB_ID
    model_arn = settings.BEDROCK_MODEL_ARN

    prompt_template = '''
        Instructions:
        You are an expert in the Civil Code of the Philippines.
        Unless otherwise stated, assume that you are talking about Philippine laws.
        You are answering a client's question. Be direct, straight-to-the-point, professional, but be empathic as well.
        Always state relevant law names and links if possible and available so that the user can double-check and cross-reference.
        You may use your pretrained data for response, provided it does not conflict with the search results.
        If there are no search results, feel free to look into your pretrained data.
        The data from the knowledge base has more weight than your pretrained data.
        If you are using pretrained data, always state the relevant law names and links (e.g. "According to....").
        If there is a conflict between the data from the knowledge base vs. your pretrained data, explain it, but give more weight to the knowledge base.
        If there are any conflicting provisions, explain in detail the conflict, and choose one path.

        Here are the law database results in numbered order:
        $search_results$

        Here is the user's question:
        <question>
        $query$
        </question>

        $output_format_instructions$

        Assistant:
    '''

    response = self.client.retrieve_and_generate(
        input={
            'text': query
        },
        retrieveAndGenerateConfiguration={
            'type': 'KNOWLEDGE_BASE',
            'knowledgeBaseConfiguration': {
                'knowledgeBaseId': kb_id,
                'modelArn': model_arn,
                'generationConfiguration': {
                'promptTemplate': {
                    'textPromptTemplate': prompt_template
                }
            }
            },

        },
    )

    return response
https://github.com/ardeearam/tutorials-django-bedrock/blob/main/app/lib/bedrock.py
This is the central code of the whole project, and there are some things that we need to unpack here.
retrieve_and_generate method
We access the Bedrock API using the retrieve_and_generate method of the boto3 bedrock client. In our code, we provided the minimum parameters for Bedrock to work, namely:
- The query. This is simply the user's question.
- The text prompt template, where we speak to our Large Language Model on what we want to achieve, and several conditions and restrictions on our desired result. We use prompt engineering techniques to get the outcome that we want.
- Knowledge Base ID. This is just the identifier of the Bedrock knowledge base that we recently created. We will see where to obtain this information in a bit.
- Knowledge Base Model. We choose Claude Sonnet 3.7 as our text generative model. We need the ARN (Amazon Resource Name) of Sonnet 3.7, and we will get to that later.
- Knowledge Base Region. Simply the AWS Region where your Bedrock resides. I prefer using the
us-east-1(North Virginia) region, as it is the most advanced region when it comes to service features. All bleeding edge features and upgrades are deployed here first.
As standard security practice, we do not hardcode the various information about our knowledge base. Rather, we pass them as environment variables to our application to prevent accidental exposure of the values, say in our code repository.
Instead, we put these sensitive pieces of information in an .env file, and prevent it from being committed in our code repository by adding it in .gitignore.
More parameters can be provided to modify the behavior of retrieve_and_generate. You can visit the AWS Boto3 documentation on retrieve_and_generate to learn more.
Placeholder Variables
You'll notice strange variable-looking items in our code such as $query$ and $search_results$.These are called placeholder variables. They are Bedrock-specific variables that are replaced during runtime.
$query$- This is a rephrasing of the user query to be sent to our Pinecone vector database to search for relevant information. Rephrasing occurs to be more effective in getting related and relevant knowledge from our database.$search_results$ -The retrieved results for the user query. This is the "retrieval" part of the "Retrieval-Augmented Generation". This is where the search results from our Pinecone vector database get inserted.$output_format_instructions$ -The underlying instructions for formatting the response generation and citations. We need this especially when we want to get citations or references — a hard requirement of our chatbot.
# app/settings.py

import environ
import os

# Build paths inside the project like this: BASE_DIR / 'subdir'.
BASE_DIR = Path(__file__).resolve().parent.parent

# Initialise environment variables
env = environ.Env()
environ.Env.read_env(os.path.join(BASE_DIR, '.env'))

# Bedrock Settings
BEDROCK_KB_ID = env('BEDROCK_KB_ID')
BEDROCK_MODEL_ARN = env('BEDROCK_MODEL_ARN')
BEDROCK_REGION = env('BEDROCK_REGION', default='us-east-1')

# ...We modify app/settings.py to allow us to supply Bedrock-related information through environment variables.

We can find BEDROCK_KB_ID by going back to the home of our particular Bedrock Knowledge Base and by obtaining the Knowledge Base ID.
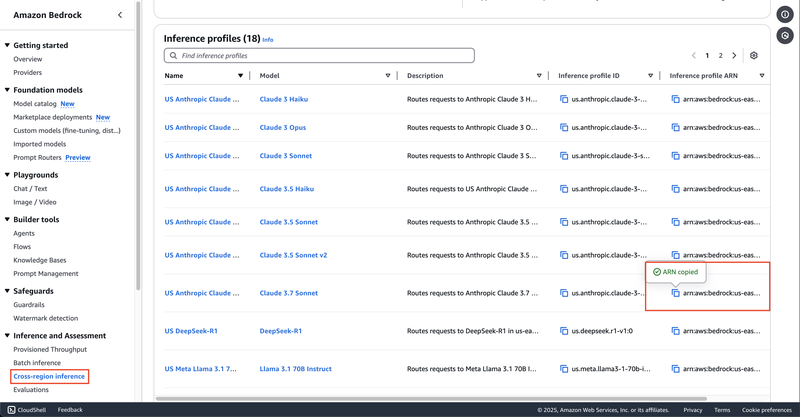
For BEDROCK_MODEL_ARN, we specifically chose to use a cross-region inference endpoint, as the default regional inference endpoint is severely throttled it's unusable. Click here to read more on regional vs. cross-region inference.
From the lefthand sidebar of Bedrock, go to "Inference and Assessment > Cross-region Inference".
Go to your Large Language Model of choice (in our case, Claude 3.7 Sonnet), and copy the corresponding Inference profile ARN. The value here will be our BEDROCK_MODEL_ARN.
For BEDROCK_REGION, simply provide the region where your Bedrock is.
#.env
BEDROCK_KB_ID=XXXXXXXXXX
BEDROCK_MODEL_ARN=arn:aws:bedrock:us-east-1:XXXXXXXXXXXX:inference-profile/us.anthropic.claude-3-7-sonnet-20250219-v1:0
BEDROCK_REGION=us-east-1
Supply the values in your .env file.
Don't forget to add your .env file in the .gitignore file. We do not want this to be publicly visible.
4.4 One, two, three, run!
Finally, our code is ready for viewing. Launch Django as usual. Do not forget to set the AWS_PROFILE — this should be the AWS profile with full access to the resources mentioned here, specifically Bedrock, S3, and Secrets Manager.
export AWS_PROFILE=demo01
python manage.py runserver
We ask: "At what age does a person attain the legal capacity to enter into contracts under the Civil Code?"
(Optional) 5. Deploy to AWS Lambda
If you want your project to be publicly visible, you can choose to host it on AWS's serverless platform, Lambda for less than $1 per month. We have an extensive guide on how to deploy a Django project on AWS Lambda.
View Live and Download the Code
You can view our RAG-enabled LLM chatbot here: https://django-bedrock.demo.klaudsol.com/
You can view the source code here: https://github.com/ardeearam/tutorials-django-bedrock/
Happy coding!
